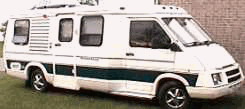
Restoring Your LeSharo / Phasar
By John Elliott [email protected]
So you have one of those funny little French drive train motorhomes that is getting older by the minute? Is it about time to perform some restoration on it? Here’s my step-by-step guide used on one of the cruddiest coaches you could imagine. Before I wouldn’t have slept in it if you had paid me. Afterwards all my friends are envious of our "classy" motorhome. The entire process will take you and your spouse about 3 weeks, non-stop.
NOTE: This was a restoration of a 1984 LeSharo Turbo Diesel, but most information applies to all LeSharo and Phasar models.
1 – RESEAL THE COACH (yours is leaking)
Tools & supplies: Electric screwdriver, step ladder, plywood or other boards, soapy water, sponge, scrub brush, propane torch, putty knife, caulking gun, (5) tubes of Polyseamseal II, can of foam caulk, crescent wrench. Optional: MaxAir vent cap.
1 – Rear: Unscrew the side and roof body mouldings around the exterior rear of the coach. Scrub the surfaces under the moulding and rinse and let dry.
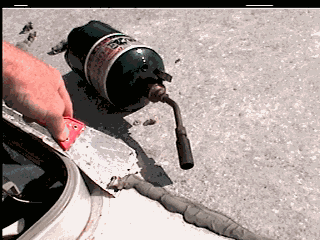
2 – Roof: Use plywood/boards on the roof to distribute your weight as you work on roof seams. (Realize you are on a sheet of thin aluminum with no truss supports.) Use torch to heat original caulk on all seams and vents. Work on 6" max at a stretch, heating then scraping with putty knife. (See photo) Texture will resemble tough marshmallow when heated. (Every seam area that has dirt under the old caulk is a ceiling leak.) Clean area.
3 – Recaulk all the above cleaned areas with a bead on the seam and another on each side forming a band of caulk that covers just beyond any previous caulked areas and touches paint. Lightly smooth your 3 caulk runs into one wide flat thick strip. This is guaranteed to last you for the next 40 years (When Greg will be upgrading us to cold fusion engines). On the rear wall and roof seams, shoot some foam caulk into the large extrusion gaps. (A little may come through behind the rear cabinets inside.)
4 – MaxAir vent cap can be installed without screws or hardware. Just caulk the base of it heavily and press onto the roof surface. NOTE: Do this at the same time you caulk the center roof seam as one edge of the MaxAir will sit on the seam.
5 – Before reattaching the back side and roof mouldings, shoot caulk into the screw holes first.
6 – Use the brush and clean all other exterior seams on the outside wall edges, windows, etc.. and caulk around them, too.
2 – INTERIOR CEILING & WALLS
The leaks you have sealed above have been rotting the interior wood behind the vinyl wallcovering wherever water got behind the vinyl. This means the walls and ceiling panels. These panels are laminates of vinyl wallcovering, overlaid on 1/8" wood paneling. Under that the core is 1" Styrofoamof sheets adhered to an exterior skin of aluminum. The back wall of the coach has some 1" wooded boards that give strength to the back wall around the rear window.
Your job now is to find all the soggy wood under the vinyl wallcovering and and get air to it. Then replace any wood that has deteriorated and turned to mush. Accessing these wet areas and refurbishing them will be well worth the effort in the long run.
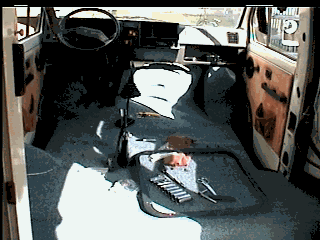
You will be best served by removing the overhead cabinets, all seats, fridge, and plastic cab ceiling and side panels. (While these are out, you will be painting them and installing new carpet all of which is detailed here.)
When you are finished you will have a complete interior restoration that will look showroom new. If you are unfamiliar with doing this sort of thing, then this project is for you! You’re going to learn a lot and be really proud of your "new" rig when you are finished.
Tools & Supplies: Black & Decker "Power Drive" screwdriver (mount the charger close to the kitchen in your house and this will become your family’s most used tool), utility knife, stubby Phillips screwdriver, wire cutters/stripper, (36) blue wire crimp connectors, connector crimp tool (it’s the blue notch on the end of some wire strippers), electric drill and bits, socket set, Dremel rotary tool and small round stone tip or, cutter tip (to remove rivet heads), (4) rolls of heavy texture wallpaper, a tube of wallpaper seam sealer, small tub of Red Devil "OneTime Ready Mixed Filler," a putty knife, 1 can of CLEAR satin spray paint, 8 cans of almond color Rust-Oleum spray paint, 1 can of semi gloss black spray paint, (2) tubes of Liquid Nails for paneling, a 4’x 8’ sheet of 1/8" Masonite-type hardboard, electric jigsaw with metal blade, an 8’ strip of 1 ½" moulding and an 8’ strip of baseboard moulding (foamcore with beige woodgrain). All of these products are available at Home Depot. Also, lots of sealable sandwich bags (for putting screws, etc. in).
1 - Remove the rear seats (Recline them and remove the 3 screws below cushions under the side
windows, and the 3 screws that bolt it to the floor in front). Remove the wood seat fascia panel attached to the sink cupboard. Remove the screws in the wood seat fascia panel attached to the furnace, but leave the end attached to the furnace (it just needs room to wiggle at the rear wall).
IMPORTANT NOTE: As you remove items, A) put the screws and parts in a sandwich bag along with a piece of paper indicating the part they go to. I.e. "Rear Seats," "Overhead Cabinets," etc.. B) use a Magic Marker and write on the back of EVERY part, seat etc. where it came from. I.e., "Front L Seat," "Front L Seat Base," etc..
2 – Remove the 4 bolts under each of the 4 front seats, and remove the seats from the coach. (It would be good to "steam" clean all the seats while they are out.) Remove all the seatbelts and their bolts.
3 – Remove the overhead cabinets by taking out the screws. Use the stubby screwdriver to remover the screws above the front track. In each long cabinet there is a single screw behind the non-sliding door. This screw is at the top center of that fixed door. To remove the doors, first pull out the rubber glide strip under it. To remove the plastic end cap, use the Dremel tool to remove the rivets. (NOTE: While these are out, you might consider shortening the cabinet over the closet to give more "headroom" over the closet. Just cut this cabinet back one section to the next vertical support and throw away the non-sliding door. (Later you will be able to mount a microwave, TV, etc. on top of the closet.) Remove and keep the TV antenna and power connector. Just cut the two wires to it and unscrew the video cable.
4 – Using the electric screwdriver, remove every plastic piece, cover, door, etc. that you can find, remembering to mark on the back where they came from (unless it’s VERY obvious). This includes the 3 cab panels which you will need to cut the wires to, and unscrew/remove all the screwed-on parts. Also remove all the black aluminum window trim from all the windows. Remove all the padded stuff, cupholders, lights, etc. that is attached to these items and mark and bag them.
Take all the yellowed plastic panels from the coach including the cabinet and bathroom doors (remove the hardware first and put it in sandwich bags marked with the item they go to). Lay them all out in the backyard on old sheets, paper, etc. and spray paint them with several light coats of "almond" color Rust-0leum spray paint. Paint the black window trim with the semi-gloss black paint. Leave them all out there for a couple of days rain or shine and let them cure (and de-stink).
Be sure and remove ALL the paneling strips that cover the seams on all walls and ceiling. These will not be replaced as the heavy texture wallpaper hides the seams.
6 - After it has dried out and you have removed all the loose stuff, take a putty knife and fill in the worst valleys and holes with the Red Devil Onetime Filler. It fills easily, dries quickly and you don’t have to be careful. (Just smooth it a little after it’s dry.
7 - The back wall will certainly have some bad spots. Go after them, too. You can replace any rotten 1" boards with 1x2" or 1x4" material from the lumberyard.
Strip off all the 1/8" plywood from the lower back panel. Do the same for the side(s) of the upper panel around the window. Cut out these partial sections of paneling straight so you can replace them with replacement pieces. First, cut out and replace any rotten 1" wood under them. When finished, cover the core area with your 1/8" Masonite. This will give a nice surface to wallpaper over when you’re done. NOTE: There are 2 bolt heads just below the window that attach to the spare tire holder. Just cut a 2" or so square around them and leave that small section of original paneling. When installing the Masonite, make a cutout for that area. Glue and screw the Masonite in place and smooth over the bolt area a little with some Red Devil Onetime filler.
9 – Reinstall the black window trim
Whew! You’re in deep now, eh? Looks pretty bare in there, but what a nice wall and ceiling finish, eh? Next comes some really pretty carpeting.
RECARPETING
Replace the old carpet in your motorhome, no matter what. It gives the rig a whole new feel and makes it look, smell and feel clean. This is a much easier project today thanks to the flexible foam backed carpet available at Home Depot, etc..
The main carpet areas will glued using the 3-M "777" product which give a nice stick while allowing for removal and realigning. The tight bends, folds and edges need the 3M Trim Adhesive. A few staples will be needed on the removable boards over the shower floor and closet.
Tools and Supplies: Buy a 12’ x 12’ piece of carpet, the kind with foam backing, Scotch 777 spray adhesive, Scotch General Purpose Trim Adhesive, a staple gun, carpet knife, heavy duty scissors, measuring tape, Sharpie marker, ice pick.
1 – Start in the rear and make a single piece that goes from the back wall into to the shower drop. Cut it a little wider than needed and trim once you get the center glued down with the 777. Work an inch or so under the edges of the sink cupboard, closet, etc..
2 – Cut a single large piece that reaches from the shower drop all the way up the firewall to the bottom of the dash. This will be challenging, but if you can do it in one piece, it will look much better than the factory job. Any mistakes are easily replaced with cut-ins that are glued in place.
4 - Use the ice pick from under the coach to push through the seat bolt holes. Cut a little hole in the carpet for each bolt hole.
5 – Cut in the smaller strips around the main door area.
6 – Pull the old carpet off the 2 boards (use pliers to get the staples out). Recover them with new carpet, glue and staples where needed.
REINSTALLING THE INTERIOR
Now it’s time to methodically reinstall your interior pieces and panels.
1 - Begin with the overhead cabinets. Screw them in place. Strip the wires and crimp them back together color for color.
2 – Reinstall the rear beds next. Use the icepick from below to line up their screw holes in the floor.
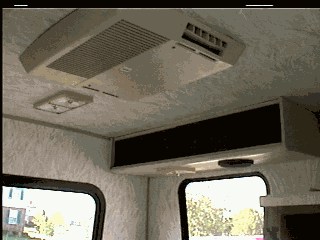
4) Install the cabover plastic panel. First, unclamp the 2 overhead rubber hoses and blow air through them. They are drains for the A/C drip pan overhead and this will clean them out. Reattach them. Reattach all the "stuff" that goes on the panel (vents, light, etc.). Screw the panel back in place.
5) Install the side panels behind the front seats. Remount all the hardware, lights, etc. first and connect the wiring back up.
6) Rebolt the seatbelts in their original spots. Note the different bolt sizes for some holes.
7) Install the middle seats. The two plastic bases are different. The one with the indent at the back (magazine holder?) goes closest to the sink. The bumpout at the floor go to the outside wall side.
8) Install all the doors, trim pieces, etc. that you still have left to do.
Mini Blinds
1 – Toss your original brown mini blinds that date and add darkness to your interior. You also can remove all the curtains and discard them.
2 - Go to Home Depot and buy (5) sets of 27" wide "room darkening" vinyl blinds in "almond" for the side windows and door window (about $9 each). Also buy (1) Bally aluminum "almond" color blind for the rear window and have them custom trim the width to 51" (about $25 each). Or, if you don’t care if light comes through this back blind, you can get the cheaper vinyl 51" ready made blind (about $13).
3 – First, install each blind using the new hardware. (Use a drill to pre-drill the holes into the wall.)
4 – Let the panels down till the window is covered about 4" below it.
5 – Trim the length by cutting ALL the strings under a horizontal slat which hangs about 3" below the level of the black window trim.
6 – On the bottom panel, remove the plastic inserts, then slip the panel out.
7 – Remove the bottom slat hanging over the window and replace it with the bottom panel.
8 – Insert the dangling strings into the holes in the bottom panel and push in the plastic inserts.
9 – With the finished blind hanging to full length, install the bottom side clips that hold the bottom of the miniblind against the wall.
10 – You now have excellent privacy and bright, cheery window coverings.
11 – You can replace your front window wrap-around, snap-on window shade with material from a sewing store. Replacement snaps (size #24, 5/8") come in kits at sewing stores. Use your old one as a template, or just mark the location of the snaps by holding up the material around the inside of the coach cab.
EXTERIOR RESTORATION
Your front fenders and lower side panels are all rusting inside. You may not see it yet, but an area behind them catches and retains wet leaves and stuff holding it against the bottom inside of the fender panels.
Front Fenders
1 - Remove your engine shroud/grill. Take the bolt and screws off the top edge of the fiberglass shroud, slide it out and unplug the headlights and turn signals. The whole unit can be lifted away and stored. Now you have access to the engine compartment.
2 – Remove the 2 side fenders. A #10 socket and extension will remove the bolts on top, bottom and from inside the doors. You can cut the wires to the marker lights if needed, and reattach them later.
3 – Clean out the cavity behind the turn signals. Get all the leaves and junk out. If you have a sandblaster ($35 at Sears, attaches to your air compressor) it will help remove the rusty stuff. Mine supports looked like Swiss cheese in there. Once cleaned, shoot in lots of RustOleum rusty metal primer, followed by a heavy coat of paint.
4 – Scrape or sandblast the rust off the back of the fenders, and coat with primer and paint.
5 – Fill in holes with Bondo, sand and repaint as needed.
6 – Replace everything (after you have checked your radiator cap for water level).
Lower Body Panels
Moisture has gotten behind your panels and is rusting them and their supports from behind.
2 – You can either sandblast/scrape these clean – or – order new fiberglass replacement panels from Mobility. Tell them John Elliott sent you and ask for their May 2001 special price.
3 – Address the rust as mentioned above in the Fender section.
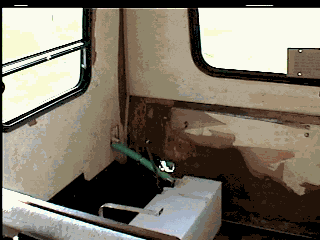
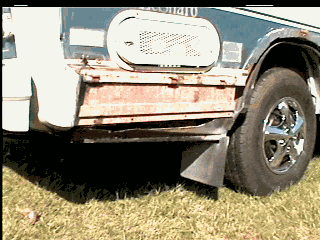
4 – While you have these panels off, clean, prime and paint the lower steel support sections located just beneath the "reddish-white" aluminum sections (see photo). If there are rotted areas in the support sections, cut the rotted portions away using a Skill saw and a metal cutting composition blade. They will be full of dirt accumulation that causes rustouts. Blow this out with a high pressure water sprayer at your local car wash. When dry, spray lots of rusty metal primer inside and out, then coat with RusOleum spray paint. Opening up these cavities will help you clean and drain them in the future. It also will allow easier access for sandblasting, priming and painting.
5 – Repaint the panels with "Truck and Van" brand "Wilmboldon White" spray paint in Wal-Mart’s Automotive Dept.. (If your coach has a blue paint scheme, also buy their "Midnight Blue" colored paint for repainting the striped sections if needed.)
6 - Replace the panels using stainless steel screws (Home Depot, Sears). (Buy 50 or so stainless screws and whenever you take out an original rusty screw anywhere on the coach, replace it with a stainless one.)
7 – Every so often, remove the panels and clean the area with a high pressure sprayer (car wash) and repaint.
Wheels
Still have those old wire wheels with the special tool to get the lock off? Time for a fabulous upgrade for $40.
1 – Remove and throw away the old hubcaps, locks, fittings, etc.. (All of it.)
2 – Clean the metal wheels removing any major grease, rust etc..
3 – Paint the wheel black using RustOleum gloss or satin black spray paint.